I received a request on doing a tutorial on how to make a shaped card using the Cricut Craft Room. I am in no way an expert at this being fairly new to making shape cards myself, but I will show you what I have learned and what has worked for me.
So when you log into Cricut Craft Room and get your new project going and get your cartridge all selected and figured out, you want to look on the left side and under options, select the tab Craft Room and select your dial size. You might have to play with this a bit until you get your desired size. When I first started dabbling in CCR, I was trying to match up layers manually and dragging layers over each other just to get the size right. Boy, when I found the dial size under the craft room tab...I was in Heaven!!
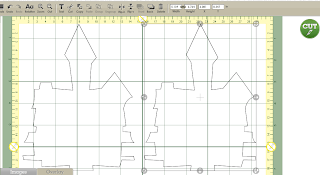
Once you have done that, make two of the same image for your main card shape. It will be either the bottom image of the layers or the shadow of the image. My image didn't have a shadow option so I just used the base layer which was the House-s image. If you leave the cursor right where it is when you start the images will be placed right next to each other.
Next you want to flip the left image. To do this, you need to select the left image and push the Flip-H button which will flip your image horizontally. Now if you've seen my ghost invitation, I had it open vertically so when I flipped it I used the flip-v button. But today I used the flip-h as it has a wider side than the top to help us get a good weld.
Once you have flipped it, you can use the arrow buttons on your keyboard to move one of the images closer to the other so they intersect each other. When they start to touch you will see the inside lines gray. This means the gray lines will not be cut lines.
Another discovery I made was that if you go too far in to connect the images, it will cause the whole image to gray out. Then nothing will be cut. You don't want this happen.
You will also see a little gray box that says has the options to weld or don't weld. It's usually on to weld. It never hurts to take a second look though.
At this point everything is welded together and you a ready to cut your base card image. On the top you can see my welded image, I cut another image of the bottom layer to get the full image. Once you have welded you do end up losing part of the image. I also have the top image and the pillars that go over the door.
So first things first, you want to fold your welded shape and give it a nice crease. You can see on the left that the image is not complete.
I then took my ATG gun and added adhesive to the full base image.to add to the top of the card.
Here is my card with that glued down on top. It is now a full base image on the top of the card.
Now with the top layer, I wanted a more dimensional look and so I added foam tape to the backside of it to pop it up!
Add it to the top of your card and voila!!
You can see how the foam tape makes it more dimensional and look like you can actually peer into the windows.

I then added the pillars above the door.
The inside I kept simple and just stamped My Craft Spot's "Happy Haunting" sentiment on the inside. You could make more of the base shape and cut it in a different color and then just score it so you can cut off the side that's welded so it fits but I chose not to do that as I was fine with the yellow color.
And here's the finished card. I love it!!Very spooky indeed!!
Hope this tutorial was helpful and interesting and thanks for taking a look. Any questions you have or requests, please leave me a comment.


No comments:
Post a Comment