Showing posts with label Tutorials. Show all posts

Sunday, October 14, 2012

Mason Jar Mummy Candle Holders

Hey friends,

Happy Sunday! I have a super cute, super easy Halloween craft to share with you today. This is not my original idea, it is one I got from Pinterest...gosh I love that site...and it can also be a fairly cheap project as well. 

They are mason jar mummy candle holders!! 


First things first. What you need for supplies are: googly eyes, rolled gauze, mod podge, and a foam brush to paint the mod podge on and a mason jar or any jar will do! I plan on making another big one once my strawberry jelly jar is all gone. I also think that baby jar mummies would also be super cute!

I don't have pictures for this first step but the first thing I did was wrapped the gauze around the jar to see how much I would use and then i cut it. After that I went down the whole strip of gauze and spread it apart just by pulling in opposite directions to get that frayed, mummy look. 

After this is done, start from the bottom of your jar and add mod podge to your jar and glue the gauze around as you go. You'll want to overlap the layers just slightly. When you're gluing, you want a good amount of mod podge so that the material sticks to it.

Here's the finished product of the first few steps. You'll want to let the glue dry so that it's easier to work with when you add glue on top of the gauze. 

Once your glue has dried, I take my paint brush again and get a good amount of mod podge on it and dab the glue on all over the gauze. Get a good amount on! Do not paint using strokes b/c as you'll find, if you use strokes, it will pull the material(possible off your jar) every which way and it's just less fight if you dab it on. 
Let this top layer dry and when it does, you'll find that the gauze has stiffened and you won't have to worry about destroying the gauze while handling it. Then I used my hot glue gun and added two googly eyes. You can also use the mod podge but this dries quicker so that's why I used hot glue. 

Add a tealight or votive candle and you're all set for a spooky(yet cute) candle holder that gives a soft glow of candlelight!

I think these are so cute!!

I hope you enjoyed this tutorial and happy crafting friends!

Friday, August 10, 2012

Fright Night Shaped Card Tutorial

Hi everyone,

I received a request on doing a  tutorial on how to make a shaped card using the Cricut Craft Room. I am in no way an expert at this being fairly new to making shape cards myself, but I will show you what I have learned and what has worked for me.

So when you log into Cricut Craft Room and get your new project going and get your cartridge all selected and figured out, you want to look on the left side and under options, select the tab Craft Room and select your dial size. You might have to play with this a bit until you get your desired size. When I first started dabbling in CCR, I was trying to match up layers manually and dragging layers over each other just to get the size right. Boy, when I found the dial size under the craft room tab...I was in Heaven!!
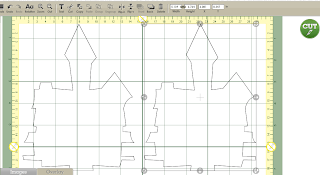
 Once you have done that, make two of the same image for your main card shape. It will be either the bottom image of the layers or the shadow of the image. My image didn't have a shadow option so I just used the base layer which was the House-s image. If you leave the cursor right where it is when you start the images will be placed right next to each other.
 Next you want to flip the left image. To do this, you need to select the left image and push the Flip-H button which will flip your image horizontally. Now if you've seen my ghost invitation, I had it open vertically so when I flipped it I used the flip-v button. But today I used the flip-h as it has a wider side than the top to help us get a good weld.
 Once you have flipped it, you can use the arrow buttons on your keyboard to move one of the images closer to the other so they intersect each other. When they start to touch you will see the inside lines gray. This means the gray lines will not be cut lines.
 Another discovery I made was that if you go too far in to connect the images, it will cause the whole image to gray out. Then nothing will be cut. You don't want this happen.
 You will also see a little gray box that says has  the options to weld or don't weld. It's usually on to weld. It never hurts to take a second look though.

At this point everything is welded together and you a ready to cut your base card image. On the top you can see my welded image, I cut another image of the bottom layer to get the full image. Once you have welded you do end up losing part of the image. I also have the top image and the pillars that go over the door.

 So first things first, you want to fold your welded shape and give it a nice crease. You can see on the left that the image is not complete.
 I then took my ATG gun and added adhesive to the full base image.to add to the top of the card.
 Here is my card with that glued down on top. It is now a full base image on the top of the card.
Now with the top layer, I wanted a more dimensional look and so I added foam tape to the backside of it to pop it up!
 Add it to the top of your card and voila!!

You can see how the foam tape makes it more dimensional and look like you can actually peer into the windows.

I  then added the pillars above the door.
 I then added a little banner sentiment on top with My Craft Spot's sentiment "Fright Night".
The inside I kept simple and just stamped My Craft Spot's "Happy Haunting" sentiment on the inside. You could make more of the base shape and cut it in a different color and then just score it so you can cut off the side that's welded so it fits but I chose not to do that as I was fine with the yellow color.
 And here's the finished card. I love it!!Very spooky indeed!!

Hope this tutorial was helpful and interesting and thanks for taking a look. Any questions you have or requests, please leave me a comment.


Monday, June 4, 2012

Dandelion Blowing in the Wind T-Shirts!

Hi everyone, 

Hope you all had a great weekend and got well rested and made it through your Monday all right. This past Sunday was another crafty Sunday for Tiff and I and we got together to work on another pinterest project. 

Dandelion t-shirts and totes!!
We started with our totes for our test trial and in case we goofed up. If we goofed up it wouldn't be on our main projects, the t-shirts. 

So our supply list was as follows:
  • T-shirts
  • Totes
  • White, Black, and Green Fabric Paint
  • Glitter fabric paint
  • Loofah
  • Paintbrushes
  • Cardboard to protect inside t-shirt. You can buy a t-shirt form from Hobby Lobby or use just a cereal box. 

 We started with the white paint and dipped the loofah in the paint and just bounce it up and down and in somewhat circular motions to form the main part of your dandelion. Until you get the hang of the technique, just use a little bit of paint at a time.
 Make sure you think about where you are going to put your design as we were laughing about how we didn't want to end up with a giant white blob on an inappropriate spot. Starting in one of the bottom corners of your shirt is a good way to go.
 Next draw a green stem with one of your paintbrushes. We drew ours at a slant so it looked like it was blowing in the wind.
 Then using a small paintbrush, make some dandelion seedlings blowing off the dandelion in the wind. Make them go across your shirt and maybe over your shoulder and onto your back.
 Then with a thin paintbrush, add a small black stem to each little seedling. This is a must as it gives the design a much more life-like look to it.
 After this is all done, the white paint is pretty dry. You can then add some sparkly paint. The best way to apply this is with a paint brush and move it in circular motions. If you just sweep it the glitter will kind of clump together and won't be so even. Make sure you add a little bit of glitter to each seedling as well.
 Voila!! Pretty simple!!

 Here's all four of our finished items drying on the deck a bit.


These shirts are so pretty and easy to make and perfect for the summer time!! Hope you've enjoyed this fun tutorial and happy craftin'!!

Tuesday, May 8, 2012

Fan-Fold Flower Tutorial

Hi everyone!

I was asked how I make my fan-fold flowers and so I thought I'd do a tutorial to show you how I do it.

Start w/ a 1" x 12" strip of patterned paper:
 On your scoreboard, score your paper at 1/2" intervals:
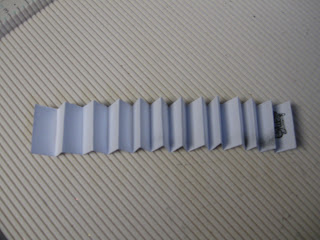
 Once you've  scored your entire strip, begin to fan-fold it:
 It should look like this once you're done folding it:
 With a strong adhesive(I usually use my ATG gun or hot glue), glue the ends together and hold until it sticks. You can do this by holding it or use a binder clip so you can do something else while you wait.
 This next part is tricky and hard to really show on camera. It might take you a few tries to get it to go, but you basically need to get your flower to collapse in.So you kind of hold the outside edges and get the folds to come together and push in the center to get it collapse together. Once you've got collapsed, I usually put a little hot glue on the back in the center to get it to stay while I grab the next step:
 Now I usually use a circle but today I just cut out a quick, fast square of cardstock and glued it to the back of the flower. This makes it more sturdy and also easier to glue to your project.
 Then on the front, you can add whatever embellishment you want. Buttons, a cute brooch, or I decided to do a butterfly today.
Now I don't have any pictures of this, but you can also make your flower bigger by going up a bit. A little increase to the 1" part goes a long way!! You'll see what I mean once you make them.

Any questions about this tutorial, just leave me a comment here and I will respond also in the comment section back to you.

Thanks for looking!

Friday, April 27, 2012

Magnetic Bookworm Bookmark Tutorial

Hi everyone,

In the next few days, my blog will be getting a new look!! I'm so excited!! So you might see some things being switched around besides the new look. My husband has been helping me with this(me telling him what I want and him doing the actual work getting it to look like I want) and he has really done a great job and I'm very pleased with the results and can't wait for all of you to see it!

Today I'm doing a tutorial on making your own magnetic bookmarks. I absolutely love these b/c if your book falls or accidentally opens(happens a lot to me), your magnetic bookmark will hold fast to the page you were on and is less likely to fall out. 

I made these bookworm bookmarks with my Cricut and I used the Create a Critter cartridge. I also experimented and used My Cricut Craft Room to do sizes. I think the worms are about 1 inch and the rectangle is from George & Basic Shapes and is like 1 in by 3 in.


 So I cut everything out(all the layers and shapes) and got out my magnets also...

Then I scored the rectangular piece at 1 1/4 in and also at 1 3/8. You do this so you can fit more pages in your bookmark should you want to bookmark a section. Plus, it will help everything fit well...
 Then you fold at your scored lines and line it up...
 You then layer your layers and put your worm together...
 I used my Zig 2-way glue to put him together.
 Isn't he cute already??


 Next, I added my magnets. These you can get at Hobby Lobby and you just peel the backside off and it is all ready to adhere.

 Once both magnets are on and lined up, I glued my bookworm on the front of the blue paper..
 And here he is!! So cute and so easy to do!!

 I put him to work already!! :)
There you have it! Never spend too much money on a bookmark again(I was a bookmark addict). If you have any questions on this tutorial, please leave me a comment on this post!!

Thanks for looking and have a great Friday!!