Showing posts with label Crafts. Show all posts

Friday, August 25, 2017

Cardz TV Anything Goes Challenge #10 - "Home" Home Decor

Hello!

I am playing along with Cardz TV Anything Goes Challenge #10 and today my project I created is a home decor project I have wanted to do since we bought our house last year. I found this idea all over pinterest and just took all of the ideas and made it into my own!

I started by taking 4 wine bottles and removing the labels and washing/drying them. Then I spray painted them black with Krylon gloss spray paint. Once they dried, I decorated them with twine and other scrapbook supplies I had on hand. I got the wooden letters from Hobby Lobby and spelled out home and hot glued them on and decorated them with pearl scrapbook embellishments. I layered a bunch of flowers together to create the "O" for home. The hardest part was hot gluing the twine all the way around constantly but once it was done, I was very pleased! This sits on my entryway table when you first walk into my house.


Hope you enjoyed and thanks for stopping by!

Jen

Saturday, March 30, 2013

Colored Deviled Easter Eggs

Hi everyone! 

I'm sure many of you are gearing up for Easter and with that I'm also going to be sharing something I tried out today that I picked up from a few different Pinterest links!

So for Easter, one of my favorite foods I look forward to eating are Deviled Eggs. I'm sure a lot of you also can agree with this statement. Well this year I found the idea off of Pinterest to make colored Deviled Eggs!

You will need:
Vinegar
Cups
Food Coloring(I used McCormick's Neon food dye)

Then whatever you use to make your deviled eggs. 
Hard-boiled eggs
Mayo(I use olive oil mayo by Kraft)
Mustard

You fill your cups 2/3 of the way full with 1 tsp. of vinegar and then add 3 drops of food dye to each cup for each color. Mix then up and then add your halved egg whites. I was able to add 3 halved egg whites to each cup. I was also multi-tasking and dying eggs at the same time. The purple takes a very long time to get the deep color that I got, so I added a lot more drops of dye to speed the process up. 

 I forgot to take a picture, but once you reach your desired color, let them dry on a paper plate lined with paper towels and then once dry, fill 'em up and gobble 'em up!!
So pretty and soooooo yummy!! 

Happy Easter everyone!!

Original idea from: Real Mom Kitchen

Saturday, December 29, 2012

My Handmade Christmas Gifts for 2012

Hi all!! I hope you had a Merry Christmas and are looking to bring on the New Year!! I just wanted to share the handmade gifts that I created for everyone this year. I was definitely busy and creating some of these last minute!!

I have been teaching myself to crochet and my first project I decided to tackle was to make infinity scarves just using the single crochet stitch. These were made for all my hubby's siblings and his two cousins(all in elementary). The four on the left are his siblings'...they all had different colors they like. The black and yellow was for my hubby's cousin and she likes the Steelers. The navy blue and orange scarf is for the other cousin and her favorite team is the Bears. The kids liked them a lot and wore them the entire time they opened gifts.
 I packaged them in these super cute felt bags that I got at Hobby Lobby which were half off at the time!!
 My parents got a gift card to Olive Garden and this is the handmade gift card holder made using the Artiste cartridge and the spaghetti image is from the Fast Food cartridge.
 It pops up when you open up the gift card.
 Here are all the gift cards I made. All pop up. The presents ones are generic gift cards and then the two book gift cards are for Barnes and Noble gift cards and the book is made from Sugar and Spice cartridge.
 My hubby's family has many generations of scouters and this was at the 100th celebration of scouting at the Capitol. You can see the original post HERE. I wanted this to be a gift for my FIL and this was quite the work not only for the scrapbook layout but the framing of it. It is not in the frame as I wanted them to be able to open it on the wall to view the photos underneath. The hubby helped me with the framing part. He measured the flaps when they are closed and cut a slit down the front of the page protectors and when he slides the page in he opens the flap straight up and it goes down the strip and this way the inside photos are protected. Then we cut another page protector in half to slip over the flap that opens and to make it secure and snug, my hubby ironed the top of the protector to melt it shut and then when it cools slipped it over the flap. Then I added the navy blue paper to fill in the spaces above and below the layout and it looks like the Cub Scout uniforms my hubby's triplet brothers are wearing in the photos.

Then before putting the layout on frame, I glued page protectors over the navy blue parts to protect them as well and then glued on the layout on top.
 My FIL loved it and is going to put it in his office. This is what it looks like when you open it. The hubby's Grandpa and Uncle are also both scouters and loved it also.
 Then for all the tea drinker ladies in the hubby's family I made these tea dispenser boxes(all paper and a chipboard base) from this tutorial HERE. I cut the Tea canister from Love You a Latte cartridge and instead of cutting the letters for it out, just stamped "tea time" on the canister.
 They are packaged with Celestial Seasonings(my favorite tea brand) Holiday Teas: Nutcracker Sweet, Sugar Cookie Sleigh Ride, Gingerbread Spice, Sugar Plum Spice, and Candy Cane Lane. Because I gave them two of each flavor and was going to mix them(they are not individually packaged), I also made my own tea envelopes from the Artiste cartridge and made labels for them using Return Address labels. I made 50 of these envelopes!!! They turned out super cute and need to make one for myself now!

Phew!! And there is my handmade gifts for 2012 Christmas. Now I'll need to be on the lookout to find new ideas for next year. Thanks for visiting all!!


Friday, November 30, 2012

Cut It Up Challenge #7--3D Holiday Project

Hi everyone!!
It's time for another challenge at Cut It Up Challenges!! This week our challenge to you is to make a 3D Holiday project. It can be any holiday but as always, you must include a die-cut. 

Here is my creation:

I made this cute little tea bag dispenser for a gift for someone this Christmas. I plan on making a few different ones, and I will post my different versions at a later date. I found a tutorial(there are many out there) on how to make this card stock tea dispenser and then I decorated it with some papers from The Paper Studio. I added some ribbon in the center for a bit of a border, added some red and green flowers on top, and for my die-cut I used this "Tea Time" die-cut from Love You a Latte cartridge. I just love how it turned out. The tea bags in the dispenser will not be the ones I will be gifting. 
The ones I will be gifting have no envelope. I will be making my own tea bag envelopes for them and gifting a variety of holiday teas. Can't wait to give these away!!

Some close-ups:


Here is the prize we are giving away, sponsored by Cut It Up:
Please go and check out my other DT sister's projects at Cut It Up and play along with us! Remember to include a die-cut!!

Friday, October 19, 2012

Cut It Up Challenge #4--Trick or Treat, Smell My Feet Treat Cones

Hi again,

Happy Friday everyone!! It's time for another Cut It Up Challenge! Challenge #4 is to create a Halloween/spooky themed project. Make sure you include a die-cut!!

So since this is a Halloween challenge, I just had to make some treat holders. I found this Cricut Craft Room Exclusive Cones digital cartridge and knew I had to make these! I used the cone that has a lid on it In the photos, the lids are already tucked down and closed over the treats. I embellished them with images from Trick or Treat cartridge and the spider webs are from Happy Hauntings. 
 Close-ups:


I just love them!! Hope these inspire you to make your own treat holders for Halloween!! Happy Hauntings, friends and thanks for taking a peek!! Join us over at Cut It Up and don't forget to include a die-cut!!

Sunday, October 14, 2012

Open if You Dare Coffin Treat Box

Here's another little "treat" for you on this lovely Sunday!

I made this cute little coffin treat box for My Craft Spot's challenge #72--A Treat for You challenge. This 3D box is from the Happy Hauntings cartridge and is cut at 6". I cut it in gray and then also cut some layers for the top of the coffin and the inside lining of the cartridge with this purple patterned paper from DCWV's Fall & Halloween stack. I then stamped the purple patterned paper with a spider web and spider.

 I filled my box with candy corn flavored m&m's and different flavored candy corns...
 ...and then tied my box shut with this black and orange twine from Trendy Twine and added the sentiment "Open if you dare!" from My Craft Spot's Happy Haunting stamp set. I think it's so cute and very simple to put together and will be so fun to throw into a trick or treater's candy pail! 

There you have it! Have a fantastic Sunday and thanks so much for taking a peek! 

Mason Jar Mummy Candle Holders

Hey friends,

Happy Sunday! I have a super cute, super easy Halloween craft to share with you today. This is not my original idea, it is one I got from Pinterest...gosh I love that site...and it can also be a fairly cheap project as well. 

They are mason jar mummy candle holders!! 


First things first. What you need for supplies are: googly eyes, rolled gauze, mod podge, and a foam brush to paint the mod podge on and a mason jar or any jar will do! I plan on making another big one once my strawberry jelly jar is all gone. I also think that baby jar mummies would also be super cute!

I don't have pictures for this first step but the first thing I did was wrapped the gauze around the jar to see how much I would use and then i cut it. After that I went down the whole strip of gauze and spread it apart just by pulling in opposite directions to get that frayed, mummy look. 

After this is done, start from the bottom of your jar and add mod podge to your jar and glue the gauze around as you go. You'll want to overlap the layers just slightly. When you're gluing, you want a good amount of mod podge so that the material sticks to it.

Here's the finished product of the first few steps. You'll want to let the glue dry so that it's easier to work with when you add glue on top of the gauze. 

Once your glue has dried, I take my paint brush again and get a good amount of mod podge on it and dab the glue on all over the gauze. Get a good amount on! Do not paint using strokes b/c as you'll find, if you use strokes, it will pull the material(possible off your jar) every which way and it's just less fight if you dab it on. 
Let this top layer dry and when it does, you'll find that the gauze has stiffened and you won't have to worry about destroying the gauze while handling it. Then I used my hot glue gun and added two googly eyes. You can also use the mod podge but this dries quicker so that's why I used hot glue. 

Add a tealight or votive candle and you're all set for a spooky(yet cute) candle holder that gives a soft glow of candlelight!

I think these are so cute!!

I hope you enjoyed this tutorial and happy crafting friends!

Thursday, September 20, 2012

Blogiversary Giveaway Winner!!

Hi everyone!

Sorry I am late posting the winner of my blogiversary giveaway...I kind of, sort of lost track of the date...so sorry!

Anywhoo.......the winner of my giveaway(randomly selected) is .......................................................................................................................................................................................................................................................................................................................................................................................................................................................................................................

Tiffany!!! 

Congratulations Tiffany!! Send me your info. to my email and I will get your prize out to you!!

Thanks everyone who played along and for the congratulations!! Have a happy scrappy Friday!!!

Tuesday, September 4, 2012

1 Year Blogiversary + A Giveaway!!

Hi everyone!

Hope you all had a nice relaxing Labor Day weekend. So I realized this weekend that the last day of August was my 1 year blogiversary!! I had started this blog more than a year ago b/c I really wanted to get into blogging and at the time I was trying to figure out what I wanted to blog about. I tried a healthy and fitness one and everyday life kind of thing but it just didn't click for me.

Then after coming across other paper crafting blogs and challenges, I finally decided what I was passionate about and wanted to blog about so much that I would blog more frequently than my previous attempts. Since entering the blog world of paper crafting, I finally got my wedding album and my honeymoon scrapped and have moved on to more recent events to scrap! Not to mention becoming a Design Team member on two different teams and making great friends! It has been an amazing first year!!

So in honor of my blogiversary and an amazing first year, I am having a RAK giveaway!

5 pkgs. of Halloween themed embellies, 1 pkg. of gemstones, and 2 pkgs. Halloween ribbons. I will ship internationally!

All you have to do to win this batch of goodies is:

  • You must be a follower
  • Leave me a comment for a chance at the prize. 
  • Leave me a second comment that you have posted about my giveaway on your blog for a second chance to get your name in the draw. This could be a post on your blog or putting the picture in your sidebar. Please leave me your blog address so that I can check it out!
  • Leave me a 3rd comment that you are a follower on my Facebook page.  http://www.facebook.com/ScrappinExpectTheUnexpected
That is a total of 3 times you could get your name in the draw for this prize!! The winner will be announced on September 20th! You have until September 19th, 11:59 p.m. CST! The winner chosen will have 2 weeks after prize is announced to claim their prize before they forfeit their win. 

Spread the word about my very first blog giveaway for my blogiversary!!
Thank you so much!

Friday, August 17, 2012

You and Me Annibirthary Gift Bags


Hi everyone!!

So today's post is a couple of gift bags I made for my husband's birthday and our anniversary.My husband's birthday is the 20th of August, mine is the 26th, and our anniversary is the 29th. So we usually celebrate everything all together. One gift bag is from me and one I made for my parents to give him. I know what he wants so they just had me order it and then I decided to also make a gift bag for them to put it in.

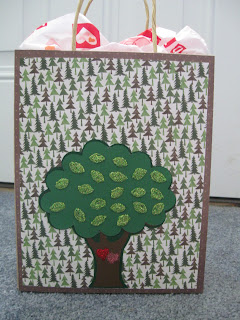
So the gift bag from me is for A Cherry on Top's Altered Item Challenge and it was to decorate a gift bag and use a stamped image and some kind of sparkle!   Using my cricut, I made the tree and sentiment from the Sweethearts cartridge and then put heart shaped apple rhinestones on it instead of using the cut leaves the image comes with and stickled the hearts on the tree. I stamped the tag with happy b-day and then wrote underneath it "and anniversary". I really need a stamp that says Happy Annibirthary". teehee I also tied some red ribbon(2 strands of it) and some frayed white ribbon(also 2 strands of it) to the handle.

I kept the one from my parents a little bit simple. Same crciut cut but this time I used the leaves and then stickled them with lime green stickles.


Tuesday, August 14, 2012

Garden of Weedin' Layout

Hi everyone,

Lots of bling on the layout I have to show you today. This is a layout of my friend and I making our DIY Dandelion blowing in the wind t-shirts. We made them with a loofah and fabric paint. You can check out the post on this craft HERE. 

I got a little crafty with this layout as well. I used this sketch from PageMaps:

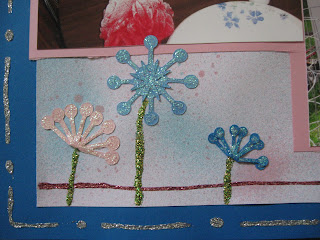
I thought this sketch was very fitting as the flowers look like the dandelions we made. I started out with the blue card stock base and then took a white card stock and spritzed it with Tattered Angels Electric blue glimmer mist and then spritzed it with Tattered Angels Viva pink glimmer mist. Loved the results. It matched my photos perfectly!!
I then went around the bottom and top of the white glimmer misted paper with some pink glitter glue and then around the blue edges with some silver glitter glue. It's a very sparkly layout with so much bling!
 Since dandelions are weeds, I went with the title of "Garden of Weedin'" and I cut this at 1" from my Cricut and used green card stock and then went over it with green stickles!
 From my Accent Essentials cartridge, I found this "flower" cut and it's in a group of flowers. Almost looks like snowflakes. It cuts 4 images at once. Two of the snowflake/flower, one diamond shaped image, and what looks like a sparkle/asterisk image. For the open ones, I layered the two snowflake flowers together and then some I folded over to get the smaller ones on the bottom. Then I stickled them with Crystal stickles and used green stickles for the stem.
I've very pleased with how this layout turned out and I think it's very crafty for a crafty subject that I was scrapping. 

 Thank you for taking a look and your comments are appreciated!

Happy Scrappin'!!


Friday, August 10, 2012

New Challenge Blog!!

A new die cut challenge blog is coming soon!! It is the "Cut It Up Challenge Blog" that will focus on projects that include a die-cut. These ladies are looking for their first DT so if you are looking for an amazing opportunity to inspire others with die cutting/paper crafting abilities, you need to check them out HERE!! They are also having an amazing giveaway HERE. By the way, you can also like them on Facebook if you go HERE. :P

Spread the word for this upcoming challenge blog!!

Thank you and happy craftin'!!

Be back later with a tutorial on making shaped cards in the Cricut Craft Room.

Thursday, July 5, 2012

4th of July Events

Hi everyone!

Hope you all had a great 4th of July yesterday!! I had fun doing our usual: We had supper and then headed over to the Capitol and listened to the symphony play and then watched the fireworks they light off at the Capitol. It was probably the coolest 4th of July we've had in a while. Most certainly one of the cooler days this week!!

Here's our breakfast that we started 4th of July off with. Again, courtesy of Pinterest.


So yummy!!!

I also have some better pictures from yesterday's craft. My hubby takes much nicer pics than me trying to get the right angle of myself. lol!

I did find another use for the rosette I made that I ended up not using. I just added a saftey pin to the back and added it to my outfit yesterday!!

A couple more pics of my rosette headband! I just love how it turned out!!

Let's get closer...

And now I'll share a few photos from our fun 4th of July evening!!

Bill and I on the Capitol grounds saving a spot for the rest of the family.


I love how many people show up for this every year. It goes pretty far back as you can see.

Every year, they leave some lights on in the Capitol to spell out the "4th".

I captured some good pics of the fireworks I think...


Thanks for taking a look and have a great Thursday everyone. Friday is almost here!!